When you’ve finished digitizing all the information on your map sheets, you’ll have a bunch of codes—but what do they actually mean? To add such information to the attribute tables, we’ll join a table with descriptive information to the attribute table of the spatial data.
The table will contain columns for, at minimum, the Code and the English. You may also want to include information about the Theme and the Category or any other pertinent information, such as the word in your language. We will tell ArcMap to join the attribute table and the spreadsheet together, based on the Code. ArcMap will then add the information from the corresponding row in the spreadsheet to the attribute table. Joining tables will save us the trouble of typing out the information for each point, and even selecting from a drop down table. You will need to repeat the instructions in below for your point, line and polygon files.
Tutorial: Creating tables
1. Open Excel.
2. Create a spreadsheet with the values for the Code, Category and Theme, and any other information related to the codes that you may potentially find useful. Note that the Codes should match the codes in the attribute table exactly.
3. Save your spreadsheet.
4. Close Excel. Now, we’ll add the table into ArcMap and use it to put English words for the codes into our tables.
Tutorial: Joining tables
1. Click the Add Data button![]() and add the spreadsheet into ArcMap.
and add the spreadsheet into ArcMap.
2. Right-click on the layer to which you wish to add attribute codes. Highlight Joins and Relates and then select Join.
3. You see the Join Data dialogue box. Select Join attributes from a table.
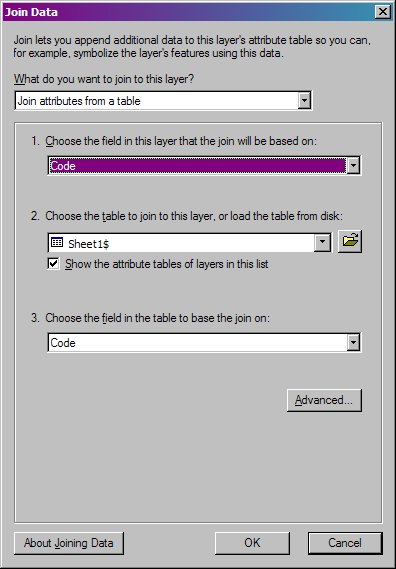
4. Select the Code field in Step #1.
5. Make sure the correct table is selected in Step #2(it should be the spreadsheet you just added into the file).
6. Select the correct field in your table.
7. Click OK.
Tutorial: Exporting new data with new attributes
1. Open the attribute table of UOM_POINT_TEMP. The codes in the excel table/dbf will now match up to the codes in the attribute table and the information will be in the table too.
2. Right click on UOM_POINT_TEMP and export the data.
3. Name the file UOM_POINT_FINAL.
4. Click Yes to add the data to the map.
5. Open the attribute table of UOM_POINT_FINAL. There will be an extra Code Column. You can safely delete it.
6. Remove your UOM_JOIN_TEMP and all other previous layers.
Note: with earlier versions of ArcGIS, you may not be able to add Excel files into ArcGIS. In this case, you will export a dbf:
1. Save the Excel file as a dbf file. You will get a few warning messages about the format – ignore them and continue to save as a dbf. Note that the selected cell cannot be empty.
2. Close Excel.
3. Add the dbf table into ArcMap.