It’s quite possible that you have only one code per point on all your maps. If so, appending won’t be necessary and you can move onto Tables. Likely, though, you have more than one code for some features – you will have entered this code in the Code2, Code3, etc. fields. When mapping features with several codes attached, it is difficult to display the icons for each point and it would require a great deal of work to map out the various themes from several different fields. In order to make the dataset easier to work with, we will create new features for each code. These new features will lie directly on top of one another.
To create new features, we will form a series of definition queries that will allow us to view only those features with more than one code. We will then export each different dataset which has been limited by the definition query as a new dataset, append all the queried layers, and finally, work with a single code field.
Before beginning, we’ll make sure the CCount is correctly entered for each column, or else our definition queries won’t work correctly. You can sort the CCount column, and visually scan the columns to ensure that they have the correct number of entries. This is a form of Quality Assurance.
Tutorial: Quality assurance before appending
1. Click Selection and then select Select by Attributes.
2. Ensure that the correct layer (UOM points) is selected.
3. Double click CCount, then select > and 1.
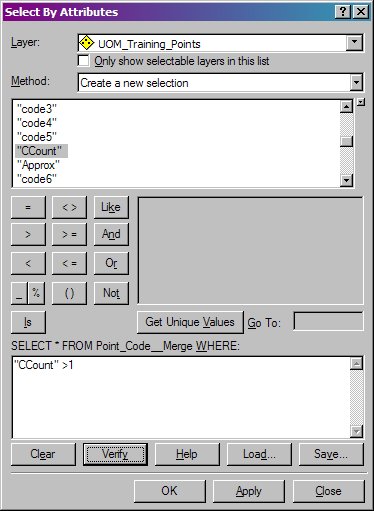
4. Click Verify to make sure your syntax is correct, then click OK. The program will select features where the CCount is greater than one.
5. Open the UOM points attribute field. At the bottom of the table, click the Selected button . Only the selected features will be shown.
6. Right-click on Code2 heading and select Sort Ascending . If you have any blank spaces in Code2 column, you will have to adjust the CCount to reflect the number of Codes.
7. Right-click on CCount and select Sort Ascending.
8. Review the Code columns. They should form half pyramid: as the CCount increases, the number of codes in the Code column should increase correspondingly. If you notice any errors, fix them.
9. At the bottom of the attribute table, click the Options button and select Switch Selection . This will change the selected attribute from CCount > 1 to CCount <=1
10. Right-click on Code 2 header and choose Sort Descending. Any rows that have a code in the Code2 column must have a CCount of 2 or greater – fix any errors you find.
Now, we’ll export versions of our dataset. The different versions will be: one that only contains features that have a second code (i.e. those with a Code2), one that only contains features that have a third code (i.e. those with a Code3), and so on for all the different Code fields that are filled out. We will then modify these new datasets, and finally bring them all into one file by appending them.
Tutorial: Exporting new features
1. Open the attribute table for the points. Note how many fields were used for the codes – this can be found in the CCount. The number of fields will be the number of queries you will perform, and the number of times you export a new dataset.
2. Right-click on the UOM_training_points data, select Data and Export Data. Save it as UOM_POINT_TEMP. Add it to the data frame.
3. Open the Layer Properties dialogue box.
4. In the Definition Query tab, click Query Builder.
5. Create the following code in the query builder "CCount" >= 2. This will display only those points that have 2 or more codes associated with it.
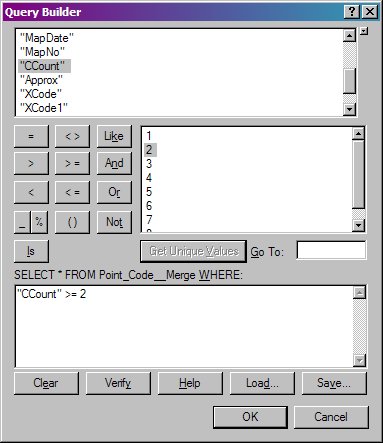
6. Click Verify. This will tell you if there are any errors with your query.
7. Click OK. Click OK again.
8. Export this limited dataset, saving it as TempPointCode2 and adding it to your data frame.
9. Repeat Steps 3 – 8 until you have exported all the appropriate CCounts. We now have several datasets that contain one feature for each code on the map. Next, we need to transfer the codes from their original Code column into the primary Code column. We will then delete all the extraneous Code columns and finally append the datasets.
Tutorial: Updating fields
1. Open the UOM_POINT_TEMP attribute table.
2. Locate the first Code column. Keep this column and delete all the other Code and XCode columns.
3. Close the UOM_POINT_TEMP attribute table
4. Open the TempPointCode2 attribute table.
5. From the editor toolbar, click Editor and select Start Editing to start an editing session.
6. Right-click on the Code1 column. Select Field Calculator .
.
7. Double–click Code2. This will update the Code1 column with the contents from the Code2 column.
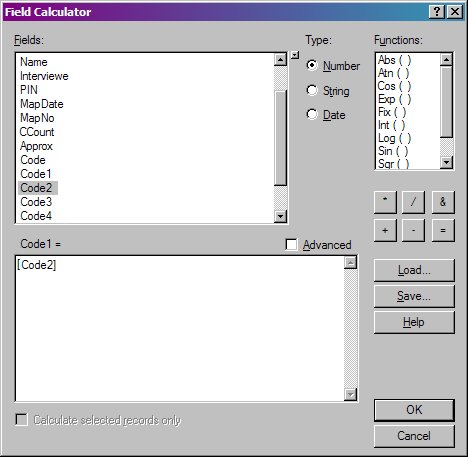
8. Also update the XCode1 column with the contents from the XCode2 column.
9. Stop Editing.
10. Right-click on the Code2 heading and select Delete Field. Repeat on all the Code and XCode columns except the first ones (Code1 and XCode1).
11. Repeat Steps 2 – 10 with all the remaining TempPointCode attribute tables. For example, for TempPointCode3, we would use the values from the Code3 columns to update the Code1 columns.
Now that we have several datasets with all the codes in one column, we can append the datasets to create a "master" dataset with all the information in one column. This will make displaying the data much, much easier.
Tutorial: Appending data
1. Export the UOM_POINT_TEMP dataset (make sure no features are selected and there’s no definition query).
2. Save it as UOM_point_FINAL. Add it to the map.
3. Open ArcToolbox![]() .
.
4. Navigate to the Data Management toolbox.
5. Navigate to the General toolbox
6. Navigate to the Append tool. Open it.
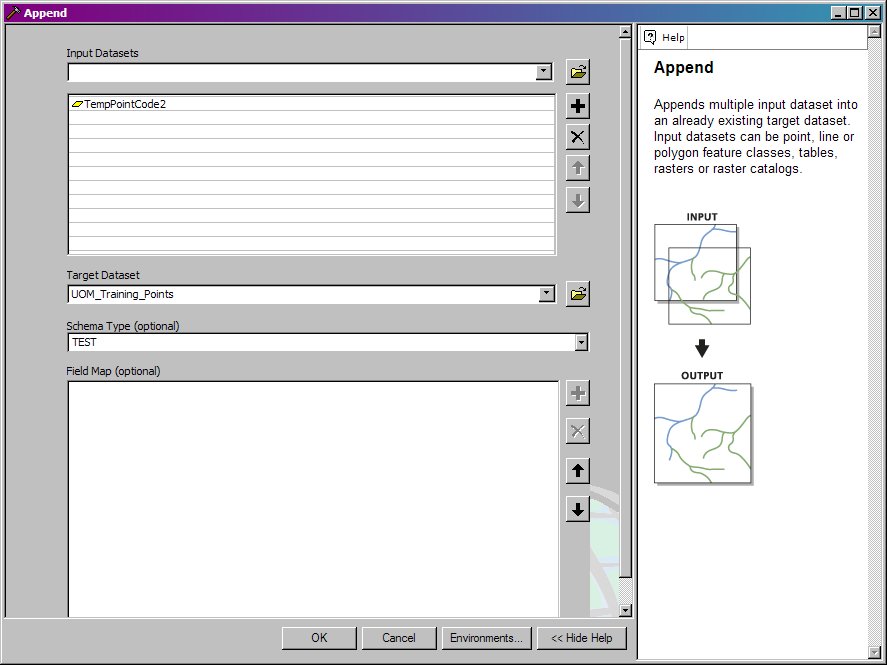
7. Drag and drop UOM_point_FINAL into the target dataset. Drag and drop all the other datasets (TempPointCode2,TempPointCode3, etc) into the input datasets box.
8. Choose TEST for the Schema Type test and click OK.
You now have one final, master dataset which has all the information. Double check the number of points in all the datasets to make sure they add up. (The number of points is listed at the bottom of the attribute tables).jpg) . Repeat for lines and polygons, if they had more than one code attached to the features.
. Repeat for lines and polygons, if they had more than one code attached to the features.