If you’ve been following along, you should have your scanned, georeferenced images and some empty geodatabases. Now, it’s time to add data into the geodatabases. To add data, we will digitize it – that is, we undertake the process of converting the points, lines and polygons on the map into points, lines and polygons in the GIS.
So, how much information should we record? Well, almost all of it. The trick is that only the points, lines and polygons will be digitized, and the rest of the information will be stored in the attribute tables. What isn’t important to record? The data on the base map (we should already have similar data), the lines connecting the features to their associated code, and the colour of the code (the colour is only to help everyone distinguish between the features on the paper map—once everything is digitized, it is irrelevant).
Digitizing can be a time consuming operation. Try to create an efficient workflow so that you minimize wasted time during the process. For example, post the map you’re working on so that you can clearly see it without having to get out of your seat. Also, make use of shortcut keys for editing in ArcMap; this will save you time and frustration:
http://webhelp.esri.com/arcgisdesktop/9.2/index.cfm?TopicName=Shortcut_keys_for_ editing_in_ArcMap
Where to start? Well, it’s probably best to make sure that you move through the map systematically, to ensure that you don’t miss any information. If you have more than one type of data on the map, it’s probably best to start with one and complete it for the entire map before moving on to the next type on the map – otherwise, you may try to enter lines into a polygon class, or points into lines, etc. It can become very frustrating!
You will have to devise a methodical system to capture points. Depending on the distribution of the features on the map, I use one of three strategies:
• Start with the areas that have the fewest features
• Start at the top left-hand corner and “read” the map like a book
• Find a distinctive feature and follow it throughout the map.
It doesn’t really matter which method you use, as long as it works for you and you stick to it for the entire map.
| TIP: Save your edits often, in case ArcMap crashes! Click Editor and select Save Edits |
Tutorial: Digitizing

1. Ensure that your scan of the UOM paper map, base map/reference data and geodatabases are all loaded into ArcMap.
2.Add the editor toolbar to ArcMap. From the View menu, select Toolbars, and then select Editor.
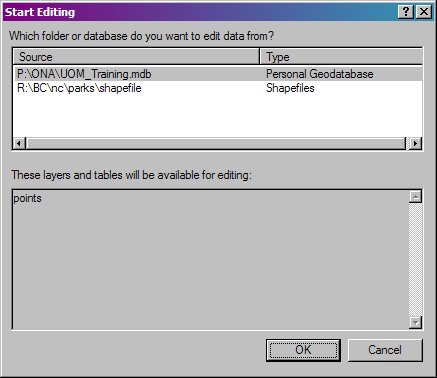
3. From the editor toolbar, click Editor and select Start Editing to start an editing session.
4. You will see a popup window. Select the location of the datasets you’re digitizing into (e.g. UOM_training.mdb).
5. Make sure that your Target in the Editing toolbar is correct (points for points, lines for lines, etc).

6. Click the Sketch button![]() .
.
7. With your sketch tool, click the center of each point marked on the map. This will add
a point into the UOM_training_points feature class.
8. Next, let’s add the attributes. Right-click on UOM_training_points and select Open Attribute Table.
9. Enter your Code and CodeNo into the attribute table. If you have more than one code, add subsequent codes into the appropriate columns
10. Repeat Steps 7 and 8 until you have captured all the points on the map.
11. Since the MapCode, Name, Interviewer, PIN, MapDate and MapNo are probably all the same, we will update them all when we finished digitizing the entire map sheet.
Right-click on each column heading and select Field Calculator.
12. Enter the appropriate information, surrounded by quotes if the field type is text, in the white box under Code=.
13. Click OK.
Tutorial: Creating a definition to use while digitizing
Once you have digitized a map sheet, you may find it useful to use a definition query to make the entered data invisible.
1. Note the object ID of the last point you entered.
2. From the table of contents, locate the layer that contains the last point you entered.
Right-click on this layer and select Properties.
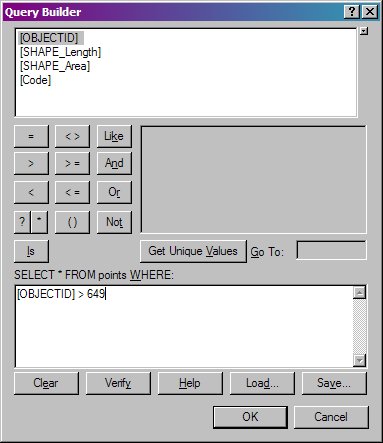
3. Click on the definition query tab and select the Query Builder button.
4. Create a query like this one: [OBJECTID] > xxx, where xxx is the last point you entered.
5. Click OK. Click OK again.
6. The points and the information in the attribute table should "disappear"! (Don’t worry,
you can get it back simply by deleting the definition query.)
7. Update this query each time you switch a map sheet.