File Types
GIS has developed many different types of files over the years. The main vector types are coverages, shapefiles, and feature classes in geodatabases. It is possible to digitize in any of these types, and each has their advantages and disadvantages.
Coverages can contain many different types of data. For example, a single coverage can hold polygons, points, lines, and other types. However, they are also quite difficult to manipulate and edit.
Shapefiles are much easier to manipulate and edit. They are an old file format that can be used by a variety of programs, not just ArcGIS.
Geodatabases can hold different types of data, including feature classes and raster datasets. Feature classes are a more modern file format with several advantages over coverages and shapefiles, including the ability to automatically calculate area and length. Geodatabases are especially useful because you can choose to create drop-down lists. This helps ensure that fewer errors are introduced into the database. Drop-down lists can also save time because you don’t have to repeatedly type out information.
These instructions will use geodatabases as its file structure.
Tutorial: Creating a new geodatabase
Creating a new personal geodatabase involves creating a special file folder on disk using ArcGIS. This is a simple, straightforward process that is performed using ArcCatalog.
1. Open ArcCatalog![]() .
.
2. Navigate to the folder where you want to create the new geodatabase.
3. Right-click on the folder, select New, and then select Personal Geodatabase.
4. Name this new geodatabase “UOM_Training”.
Field Names and Data Types: points, lines and polygons
Look at the paper maps you will digitize. What types of data did the interviewee record in their biography? They probably used a combination of points, lines, and polygons—luckily, this is exactly the type of data that GIS uses. Each type of data will have its own file within the geodatabase.
Look at the information that’s contained on the map sheet. This information will all be entered, in one way or another, into the attribute table. It’s important to take some time to set up a file structure to contain all this information.
Tutorial: Creating a new feature class
To create a new feature class in your geodatabase:
1. Right-click on your new geodatabase![]() , select New, then select Feature Class.
, select New, then select Feature Class.
2. Name your new Feature Class “UOM_training_points”. From the Type drop-down menu, select Point Features. Click Next.
3. Click Import and navigate to your reference data. Click Add. This sets the coordinate system to be the same as your reference data and image. Click Next.
4. Accept the default resolution and tolerance and click Next.
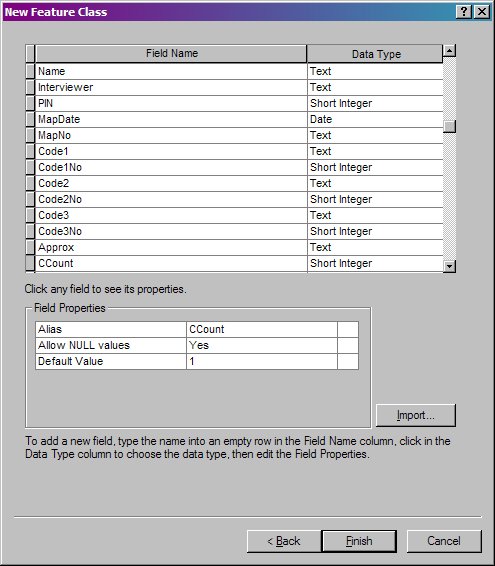
5. Add the field names as listed in the table below.
6. Set the following default values: Approx = N and CCount = 1.
7. Click Finish.
8. Repeat steps 1-7 for lines and polygons. You can import the field types when you get to step 5.
|
Field Name |
Field Type | Description |
| MapCode | Text | The code that has been given to the map to represent the interviews. E.g. UOM (YY) or E.g. 37G. If you prefer, think of this as a map title. |
| Name | Text | The person who was interviewed |
| Interviewer | Text | The person who conducted the interview |
| PIN | Short |
The personal identification number for the person who was interviewed. |
| MapDate | Date | Date that the interview took place |
| MapNo | Text | Only relevant if the interviewees used more than one map sheet in their interviews. E.g. "1 of 1", or "2 of 6 |
| Code1 | Text | Code associated with the point, line or polygon on the map. If more than one code is associated with the feature, this is the first code listed. |
| Code1 No | Short | Code number associated with the point, line or polygon that the field "Code1" refers to. |
| Code 2 | Text | If more than one code is associated with the feature, this is the second code listed. |
| Code 2 No | Short | Code number associated with the point, line or polygon that the field "Code2" refers to. |
| Code 3 | Text | If more than one code is associated with the feature, this is the third code listed. |
| Code 3 No | Short | Code number associated with the point, line or polygon that the field "Code3" refers to. |
| Approx | Text | If the code is followed by an "A" to indicate approximate location, this would be yes. Otherwise, no. |
| CCount | Short | This field counts the number of codes associated with the feature. |
ArcMap will automatically add its own fields: FID, Shape, and ObjectID. You may find that your maps don’t contain all this information, or they may contain different information. Further, you may find that you need more or less Code# and Code#No fields. These fields can be created as needed; however, it is easier to overestimate first and then delete them afterwards if they’re not required.
Domains
All of the above fields can be assigned "attribute domains" – that is, the values can be restricted to a pre-defined list of attributes.
Range domains specify the range of values that this group could have. We could use this domain with the Code#No field, but it probably wouldn’t save us any time. It is sufficient to limit the field to three values.
Coded values can apply to any of the above fields. They specify a set of values available for the field, which will create a drop down list. Setting up the coded values requires some preparation, but will save you time and prevent errors in the future .
Tutorial: Creating drop down lists
Now let’s set up the coded attribute domains. Coded value domains specify a valid set of values for an attribute. While you can set up domains for any of the fields that have repeating data, (e.g. Name, Interviewer, etc), I recommend that you only set up domains for the codes. It is more likely that you will make mistakes with the codes, so if you limit the codes you have at the beginning, it will be harder to make mistakes. If you do not have the attribute table in the beginning, you can ignore this step.
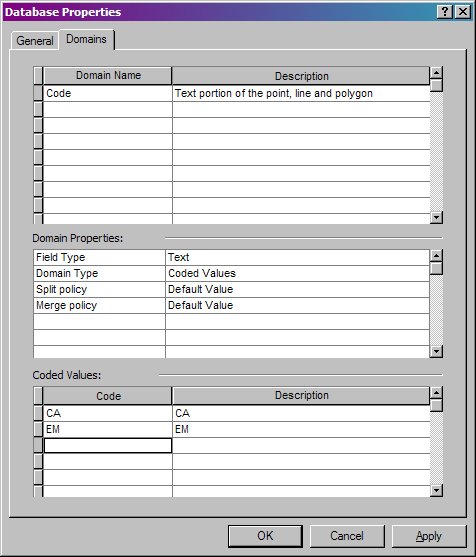
1. Right-click on your geodatabase and select Properties.
2. Enter your first Domain Name and a description. For example, "Code" and "Text portion of the point line and polygon" (see below).
3. Under Domain Properties, select the correct Field Type for the drop-down list (text).
4. Under Coded Values, enter the Code (this is entered in the attribute field) and Description (this is what you see in the drop down list – it is easiest to use the code again).
5. Repeat for all the appropriate domain names.
6. Click OK.
Now, let’s associate the fields in your feature class with the domains you just set up.
1. Right-click on the point feature class and select Properties.
2. Click the Fields tab.
3. Click on the Field Name box for the first field that you set up domains for (e.g. Code1).
4. A field properties pops up. In the white box beside the domain, select the appropriate domain (e.g. Code1).
5. Repeat for each column in which you will enter the Code (e.g., Code2, Code3, etc).
6. Repeat for each domain you have created.
7. Click OK.
Repeat steps 1-7 for lines and polygons.
NOTE: Your values may differ from those below.

Excellent! Now you’ve set up your feature classes and it’s time to have some fun!
| TIP: If you don’t think that you will ever need to use the codes, you could also enter the appropriate category for each description – for example, you could enter "Burial" for the Code and "BU" for the description. This may save you some joining trouble later in the process. However, I don’t recommend this, as it increases the potential for introducing errors, and will also make QC/QA more difficult. |