Introduction – What is image rectification?
Rectifying an image, in simple terms, means relating information to a geographic location. It is the process of assigning spatial coordinates to data that is spatial in nature, but has no explicit geographic coordinate system.
Image rectification is the first step in making a scanned map, air photo, or satellite image into a digital image with spatial coordinates. Scanned maps do not contain spatial reference information, and aerial photography and satellite imagery do not always align properly with other data you may have.
When rectifying an image, you define its location and allow it to be used in conjunction with other geographic data. After rectification, you will be able to digitize new features based on locations in the image.
Image Rectification is done by establishing ground control points (three or more geographic locations situated in both the unreferenced and referenced maps), and rectifying or permanently transforming the image to fit a grid system using a geometric transformation. This will create a new image that will match the map coordinates of the target data.
In this section we will walk through how to take an unreferenced image (e.g. a remotely sensed image such as an air photo or satellite image, or any map in JPEG, TIFF, GIF or PNG format), and assign spatial coordinates to that image using ground control points so that it can be overlaid with new data.
Getting Started
- Uploading your Image

Assuming you have a scanned image in JPEG, TIFF, GIF, or PNG format on your computer, begin by opening an Image Rectifier session by clicking on the Upload/Rectify button in the My Shapes area to the left of the Map View.
Once in the Image Rectifier, you will see the following buttons laid out in the order of tasks:

Click the “Upload New Image” button (Step 1). A pop-up will open asking you to fill in some basic information about your image.
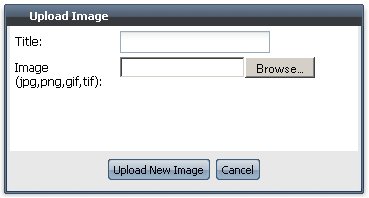
Click “Browse…” to locate the unreferenced image on your computer. When you have selected the image, click “Upload Image”.
Your image should now appear in the “Unreferenced Image” window pane to the left.

- Locating the area of your image on the reference map
Locating the same geographic area as your image can be tricky, especially if your image is of poor quality or has little in the way of distinguishable features, but here are a few tips to get you started:
Assuming you already know the general area in which your image is located, use the navigation controls in the reference map window to zoom and centre on the region. In the example shown here, the proposed cutblock indicated on the map is located along the Homathko river near Bute Inlet.
You now want to try and locate easily identifiable features that exist on both the referenced and unreferenced map. In this example, we know that the Homathko river feeds into Bute Inlet, which happens to be such a large geographic feature that it is relatively easy to spot on British Columbia’s South Coast.
Good features to look for in helping you locate the area of interest are
- road intersections
- contour lines
- labeled rivers, streams, lakes etc.
It is helpful to turn on layers that reveal matching features. For instance, the transportation layer may contain the same road features that exist on your image and can help you get as close as possible to the area depicted in your image.

Creating Ground Control Points
- Identifying quality Ground Control Points
You’ll want to identify at least three possible control points that link locations on your image to locations in the reference map. In the example shown here, we’ve selected five points to increase accuracy. There are many types of features that can be used for ground control points such as road or stream intersections, rock outcrops, the corner of a field, street corners, administrative boundaries etc. They have to be identifiable in the Reference Map so make sure to turn these layers to help identify potential ground control points.

- Adding Ground Control Points
Before your begin adding control points, zoom in and centre on the area of your first point in both the reference and the unreferenced map windows.
Make your first point by double clicking on the unreferenced image at the precise spot you have chosen. A red marker should now appear.
Repeat the same action for the corresponding geographic location in the referenced map window. Another red marker should appear. These markers represent corresponding locations in both the reference and unreferenced map.
The X and Y coordinates for each control point will now be displayed in the Ground Control Point window at the top right of the page.
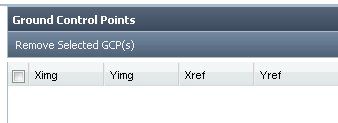
If you make a mistake, select the points that don’t match up in the Ground Control Points window, and click the “Remove Selected GCP(s)” button.
Continue making Ground Control Points until you have at least three.
Note: Try to spread your control points out as much as possible, and avoid placing them in a line. If only using three points, attempt to make an equilateral triangle whenever possible. When using four or more, try and make box. The more points you create, the more accurate the image rectification will be.

Rectifying Your Image
Once you are satisfied with your Ground Control Points, click the “Rectify Image” button. Your previously unreferenced image will now be transformed to the spatially correct location. You will now be able to see the new image overlaid on the reference map. Verify that the features in the rectified image match the base layer features.
When you move back to the Map View, you will find that your newly rectified image can be found in the "My Images" table of contents.
You can now digitize features from your image since they should now match up with features in the referenced map view.
For more information on how to digitize, see “How to digitize”.
