By: Roman Frank and Erin Anderson
| The exciting thing about mapping today is that two-dimensional paper maps are no longer the only option. Increasingly, technology allows cartographers to produce interactive and even animated flyby maps. An example of the latter, showcasing Flores Island, B.C., was created by Roman Frank of the Ahousaht First Nation. | 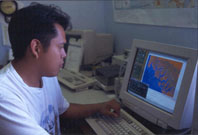 Roman Frank |
|
Click on the links below to view the animation. Flores_Island.gif [faster, 5.26MB] As you can see, the final product is quite spectacular providing a circular view of Flores Island, beginning at Ahousaht and moving counterclockwise. For a locator map of Flores Island, click here. |
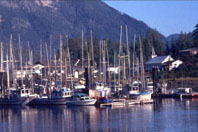 Ahousat Harbour on Flores Island |
Creating the Flyby
Three-dimensional (3D) visualization techniques, integrating surface rendering functions and map animation tools with Arc/Info, are often used for visual impact assessments. In particular, foresters can evaluate the aesthetic issues surrounding cutblock shape, size and location using this technology. Roman, however, created his flyby just for fun using the ArcTools module in Arc/Info 8.0.2.
The ArcTools module provides a series of different tools to create 3D-flyby animation. These tools, which include two for defining a flight path, one for generating flight frames, one for encoding animations and one for playing animations, are accessible within MapTools or GridTools by selecting Productivity tools from the View pulldown and then choosing animation from Types.
Roman began creating his flyby by using a TIFF image of Flores Island within ArcPlot and loading a previously created digital elevation model (DEM). In order to accentuate the view, he exaggerated the z-values to 1.5 when setting the preferences. Once all these features were set he accessed ArcTools through the method mentioned above.
To create a flyby, a flight table must be defined and then a series of flight frames must be generated and encoded. The flight generation tool allows the cartographer to interactively select points along a flight line as well as set the elevation and roll at each of these points. Alternatively, the flight circle generator allows a flight circle around an area of interest to be defined. Roman chose this option setting the flight path to 1500 meters and manually selecting the point-of-view directly at Maaqtusiis School in Ahousaht as shown in the above image.
The next step was to generate the flight frames, which Roman set to roughly every 150 meters. At each point (i.e. every 150 meters) an output image was generated and encoded. This encoding process is what allows a series of image frames to be converted into an MPEG. Be warned though – this process may take awhile. Roman’s flyby needed approximately 300 minutes to create the flight frames and string them all together. The final product, however, was well worth the wait providing a bird’s-eye view of the island.